


The soon to be released version of JHipster introduces a new architectural approach. In previous versions, we have seen monolithic apps, which are well suited for simple apps. As scaling becomes important, the microservices pattern becomes a more useful approach. JHipster 3.0 allows the user to create a microservices application to handle more complex business needs.
JHipster 3.0 is not released; this is meant as a preview of what’s to come. To follow along, please refer to the JHipster contributing readme. The names mentioned here may change and functionality may not be complete at the current time. For the latest details, please refer to the JHipster Registry readme.
JHipster now allows the user to create three application types, a monolithic application, microservice application, or a microservice gateway. As the monolithic application is the app generated by previous versions, we will only discuss the latter two application types here.
Microservice Registry
In order to have multiple microservices, we need some way to route our users to the proper microservice; this is where the microservice gateway comes in. First we must set up a JHipster registry, which is an Eureka server and Spring Cloud Config server. The registry allows the microservices to be discovered by the gateway, which will handle routing requests to the correct microservice. The spring cloud config server has different uses depending on whether we are in production or development. In development, the config server is stored on the file system, but in production mode, a Git repo is used. This allows us to store all config information for our apps in one place. When using Git for our cloud config server, we can use branches and tags to specify different configuration options.
Two options exist. Either we can clone the registry repository, or we can use the JHipster Docker image. If we clone the repository, we only need to navigate to the directory and run mvn. To use the docker image, we can use the following command:
This will start up our registry, where our gateway and microservices will register. This can be accessed at [http://127.0.0.1:8761/](http://127.0.0.1:8761/), or through our docker container. If you used a container, you must have eureka.client.serviceUrl.defaultZone point to the container, or else nothing can be discovered. Created gateways and microservices will be registered when we run our registry.Microservice Gateway
Now that we have a running registry, we can create our gateway, which will handle routing requests to the correct microservice. It will also be our entryway into the application. Generating the gateway is as simple as generating a JHipster application in previous versions. Simply run JHipster, and choose microservice gateway. For simplicity, we create a gateway with all the default options.
Starting the gateway only requires the running the mvn command after being generated. If we access the registry again, we will see the following:

Our gateway was created, and discovered by the registry as expected.
Creating Microservice Applications
Now we can finally create and use some microservices. A JHipster microservice functions in a manner very similar to a monolith JHipster application. We are asked some questions about the options we want to include/exclude in the application, and it generates the application. From here, we can create entities and begin to develop the business logic for our microservice.
Let’s actually create some microservices to get a feel for how everything works together. We will create two microservices, called Books, and Movies. Once again, for simplicity, let’s choose default options, except for the port number — use unique ports, such as 8081, and 8082. We now have two microservices, and a gateway which are all independent applications that can be used together. If you are using docker, be sure to change eureka.client.serviceUrl.defaultZone. At this point, if we log into the gateway as an admin and access the admin -> gateway page, we can see our routes.
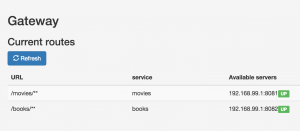
Our Zuul server (the gateway) will handle proxying requests to the correct microservice. Now that we have our microservices up and running, we can create some JHipster entities and access the microservices through our gateway. First, let’s create a book entity, which has two fields, a name, and a length. The name will be a required string, and the length will be a required Long with a minimum of 0. If you’re familiar with JHipster, you may notice that the files generated are different. A JHipster microservice does not have a UI, it consists of only the backend, and as such, we only generate the backend code. The UI will be handled by the gateway, which will have an AngularJS application which will handle accessing our microservices. Now create a movie entity for the movies microservice, give it a name and year, and sensible restrictions. We now have two CRUD microservices to be used in our application.
Using Microservice Applications
To use our newly created microservices, we can simply access the microservices by using the available routes. For books, we can call http://localhost:8080/books/api/books, and a similar endpoint can be used for movies. When we first try to create an entity, we may get an error stating that the JWT signature doesn’t match the locally computed signature.
The problem is that we have not set our JWT secrets to match. In each microservice, and the gateway, in the application.yml, we can see jhipster.security.authentication.jwt.secret. This value must match on all microservices and the gateway as described in the JHipster registry readme. As described in the readme, you can copy paste the keys, or we can put the gateway key in our spring cloud config, and the secret will be available to all the microservices as well.
Our final step is to generate the UI for the microservice on the gateway. Once the UI is generated, we can access our microservices from the gateway. In order to accomplish this final task, we will run ‘yo jhipster:entity book’, and this will generate only the client side code. When creating an entity, a prompt will determine if it’s being created from an existing microservice, if so, it will only generate the client side code. The user will be prompted for the microservice root directory.
Once this is done, navigate to entities -> book (or movie), and create some books (or movies). Once you create them, you can verify that the corresponding microservice is handling the request and inserting the entries in the database. We have now finished setting up a basic microservice application. From here, it should be easy to create a new application with microservices suiting our needs, or expanding on the existing microservices.
JHipster Console and Docker Compose
Some additional JHipster projects exist to ease the developer’s life. The JHipster Console allows setting up an ELK stack with some simple configuration to monitor the applications we can create. We also have JHipster Docker Compose which allows us to more easily start everything up. In this article, we went through starting up each piece manually. With JHipster Docker Compose, we can simply run one command and start everything needed to use our microservices.
Following along with the instructions of JHipster Docker Compose, we can quickly begin using it. We simply answer a few questions, then we are prepared to set everything up with one simple command. For our example, we just choose projects from our current working directory, which include gateway, books, and movies. You also have the option to configure ELK to monitor and once you finish answering these questions, we can simply and quickly start up our entire application. Before running docker-compose up, make sure the run mvn package docker:build in the root of each project you want to be involved in your docker-compose. After running docker-compose up -d, everything from this tutorial will be run. The resulting docker container also includes the JHipster Console (assuming you chose to monitor your application). Note that docker-compose, at the time of this writing, only works for MySql.
JHipster is adding many exciting features, and if you are interested in keeping up with the latest features, please be sure to visit the JHipster dev team google board, JHipster issues. If you have questions, check out JHipster on Stack Overflow.